
doo·dle [dood-l]
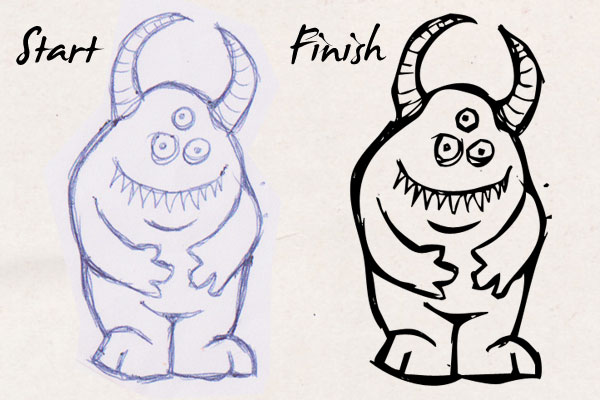
A doodle is a type of sketch, an unfocused drawing made while a person’s attention is otherwise occupied. I am always doodling while on the phone, often over important work related notes. While not all doodles are worth keeping, some are. What follows below is a quick and easy photoshop tutorial to use on your hand drawn sketches. The end result, see below, is not perfected art but rather a very stylish, edgy look. More like what you might achieve with a brush and ink.
Creating a vector mask will ensure that the art is ideal for stock art, as you will be able to scale the final image up and down without losing any quality.
*Note that this tutorial works best when you tend to go over and over your lines. If your doodles are single, delicate, thin lines this tutorial may not be for you.
Step 1. Scan in your doodle. Isolate your doodle. I use the polygonal lasso tool to quickly select around the doodle, invert the selection (Ctrl + Shft + I) and hit delete.
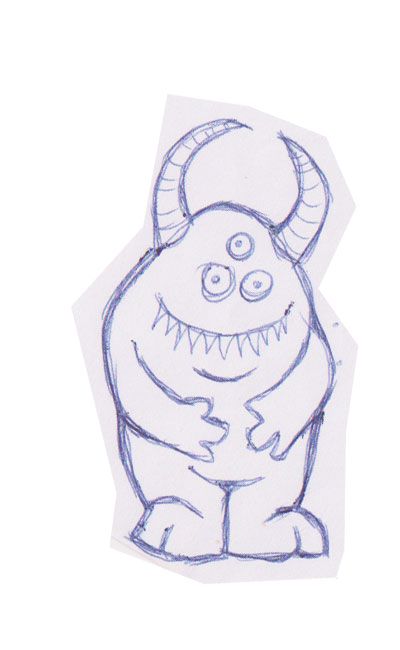
Click here to use my sketch for this tutorial.
Step 2. Remove any colour with Desaturate.
Image >> Adjustments >> Desaturate
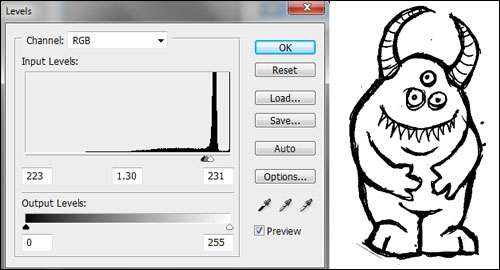
Step 3. Adjust Levels to create a black and white image.
Image >> Adjustments >> Levels
* Note this is the most important step. You can see on the image below I have moved the black, grey and white markers towards the peak in the graph above the sliders. You want to keep the lines of your sketch nice and thick.
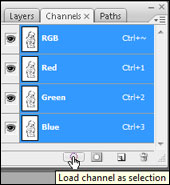
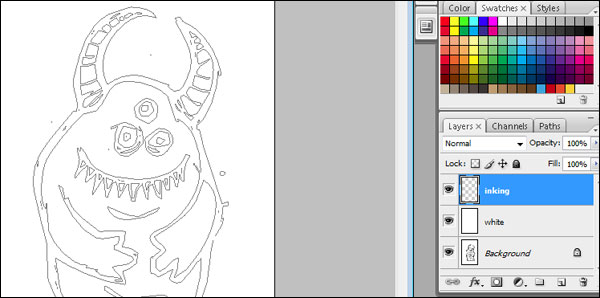
Step 4. The following steps are going to create the smooth inked look. Go to your Channels palette and select Load channel as selection. See image below.
Invert this selection (Ctrl + Shft + I) so as to select the black.
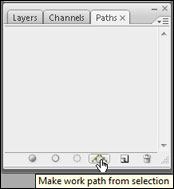
Step 5. Convert the selection into a path. In the paths palette select Make work path from selection.
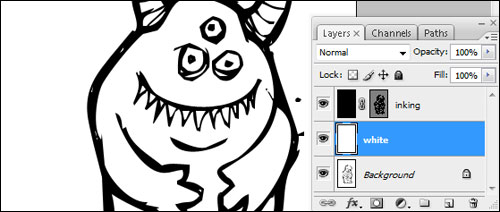
Step 6. Back to your layers palette. Create a new layer (Ctrl + Shft + N). Fill the new layer white using your paint bucket tool. Name your layer “white”.
You can now clearly see your work path on the white. See image below…
Create another layer and name it “inking”. Your layer pallete should look like the image below..
Step 7. From the top menu in Photoshop create a Vector mask from the current path.
Layer >> Vector Mask >> Current Path
Fill with black (Change the foreground colour to black and click on your image using the Paint Bucket Tool).
Save (Ctrl + S)
Due to the vector mask our resulting art is now a vector and you can scale the “inking” layer up and down using transform (Ctrl + T) and it will not lose any quality.
Thanks for taking the time to read my tutorial. Feel free to leave your comments below…
Finally, just a little side note. Did you know that some professional graphologists (people who analyze handwriting) like Anna Koren believe that these drawings reveal things about an individual’s personality?
Doodle Decoder
According to this decoder for my monster doodles… “Hmm, could you be suspicious? These types of faces indicate a lack of trust, rebelliousness or defensive feelings.”…eek!
Tags: doodles, inking, Photoshop tutorial, sketches, stock art, vector, vector mask


Thank you so much for submitting your tutorial to Pixel2life, your submission has been accepted 🙂 I look forward to more tutorials from your site in the future!
Great tut! Nice and short, but effective!
Very interesting – I’ll be making some doodles to try this out! I’ll have to try a new style, though, cuz my doodles are the “energizer bunny” ones which aren’t quite as interesting as your adorable monsters!
Thank you so much … this is what I really need. You explained as it very easy to do. I am happy to find you.
Thanks so much for this tutorial!!! I always used to take my doodles into illustrator and redraw them out there. this makes life easier!
how do i then copy and paste my vector in to a new document without losing the black fill??
Copy the layer…
In your layer palette, right-click on your vector mask layer, select “duplicate layer”. In the “duplicate layer” dialogue box that pops up there’s a destination option, select your desired new doc and click ok.
Thank you so much for this tutorial. I’ve been looking for an easy ways to clean up my doodle sketches. Finally found you!